Rolling out passkey authentication for a company can feel like a daunting challenge! We would know - we recently rolled out YubiKeys to 100% of our team. We did this because we believe that SMS and push based verification are insufficient to protect your most important assets and infrastructure given their weakness against phishing and social engineering attacks. Phishing is simply a numbers game. And we’re not willing to leave that risk floating out there, especially when we can effectively reduce it to zero.
Here’s our practical guide for how to roll out passkeys to your organization based on our past experience in security and authentication, and in rolling them out internally at ConductorOne:
Step 1 - Decide which passkey(s) to use
Your two main options are: on-device FIDO2 authenticators, such as TouchID (for Macs) or Windows Hello (for PCs), or physical passkeys, such as YubiKeys. Beware there are pros and cons to both:
On Device Passkey (e.g. TouchID) -
- Pros: Straight forward to deploy; “Free” (built into hardware)
- Cons: Not portable; bound to a single device
Physical Passkey (e.g. YubiKeys) -
- Pros: Portable across devices; can support mobile with NFC tokens
- Cons: Costly in terms of tokens ($) and distribution (time)
On-device authenticators are the most easily adoptable. They already exist on many modern laptop devices in the form of Windows Hello for PCs and TouchID for Macs. This means you can “flip the switch” on enabling passkeys, and if the application supports it, users can enroll the tokens and roll them out quickly.
The challenge is ubiquity. Your hardware environment may not be uniform and you may not have perfect coverage of devices that support on-device authenticators. Mobile devices also present a unique challenge as users will not be able to authenticate to services on their mobile device, if the service is locked down to passkey only and their only registered passkey is their laptop.
For these reasons, many companies choose to leverage physical authenticators such as YubiKeys. These authenticators use NFC or USB ports to cryptically sign a challenge issued via the web browser for the purpose of authenticating a user. As they are physical devices, you must figure out how to distribute them to your employees. They’re also small - so sadly, they are easily lost. You should expect to refresh roughly 15% of your hard tokens every year just from loss alone.
Step 2 - Decide which apps to protect with passkeys
Once you’ve identified which types of authenticators you wish to use, you’ll need to look at which apps you want to protect with passkeys. If you’re using an IdP such as Google Workspaces or Okta, you may be able to secure multiple applications behind the central authentication policy set on the directory and then lock the applications down with SSO and not allow direct login. Otherwise, the application itself will need to support passkey based authentication directly.
It’s most common to pick a single application to put behind strong 2FA first. This might be your infrastructure (e.g. AWS, GCP, AzureAD), zero trust network provider (e.g. Twingate, Tailscale), your IdP (e.g. Okta, OneLogin, Google Workspaces), or a critical business app that has customer data. Once you’ve identified the most important apps – take a look at whether they support passkeys and ideally, if you can restrict access to them via SSO only.
Step 3 - Identify your user population
If you’re a small company with a relatively uniform hardware profile, rolling out passkeys may be as simple as mandating it for all of your employees. If you’re a larger company, you’ll likely need to start smaller. Given steps 1 and 2, determine which of your users will migrate to passkey authentication first. This population can be by department, by users of the sensitive apps identified in Step 2, an “early adopters” test group, and so on.
Step 4 - Acquire and distribute the keys
If you’re going with on-device authenticators, and the service(s) you’ve selected support on-device authenticators, you may be able to skip this step. If you’ve decided to require external hardware tokens, your laptop devices do not all have on-device authenticators, and/or you’ve simply chosen to leverage hard tokens all up, you’ll need to distribute the tokens. There are several strategies that can work here, each just depends on your company culture, employee location, cost sensitivity, and ability to spend time and effort. Options include:
- Centrally procuring the tokens, and mailing them out to employees
- Subscribing to a token distribution service (e.g. YubiEnterprise Delivery)
- Allowing employees to acquire tokens and expense it in
- Maintaining a central cache of tokens that employees can drop in and grab from
There’s no right answer - the goal is to simply equip your employees.
Step 5 - Have a recovery and new employee plan in place
Users will lose their keys or get new devices. You’ll on-board new employees who may require access to these services. In both cases, you’ll need to determine how a user will procure a security key and/or how they will enroll it for the first time.
Depending on the service, bootstrap enrollment may take different shapes. Most IdPs, for example, allow users to register via an initial email. If security keys are required for authentication, the user will likely need to register it immediately or within a grace period window. This means your users will need tokens AND laptops on day 1.
For recovery, it’s common for services to either provide temporary MFA bypass options or support re-enrollment flows. Be careful with both of these. With security keys rolled out, credential re-enrollment and recovery becomes your weakest link. If you’re using a group in your IdP, for example, to bypass MFA, you’ll want to strongly authenticate users before adding them to that group. You’ll then want to monitor that group on an on-going basis, and you’ll want to ensure that users do not remain in that group for any longer than needed.
Step 6 - Communicate the plan and provide a grace period
Now your team has authenticators and you’ve identified the critical services. You’ll want to enable passkey authentication on these critical services. Before you do this, you need to communicate the plan. Let the impacted employees know what’s coming, how they’ll receive their tokens, what the process will be for enrollment, and how long they’ll have to do so.
Most IdP services, such as Google Workspaces and Okta, allow you to run with different multifactor authentication options simultaneously. This means you don’t need to hard cut over to passkeys, but instead, you can communicate the plan, monitor who still hasn’t enrolled, and drive that enrollment to 100% over an enrollment window.
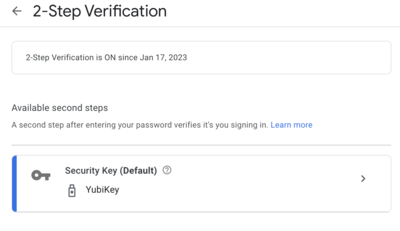
You’ll need to provide directions for the user to enroll in passkey authentication as enrollment may or may not be prompted directly by the service. For example, Google Workspace allows users to self service enrollment with hard tokens on account settings page:

Lastly, during this period, monitor enrollment and bug your users who haven’t completed enrollment yet. How you monitor enrollment is different in every app - but most provide visibility on token enrollments across your users.
7 - Turn off other authentication options
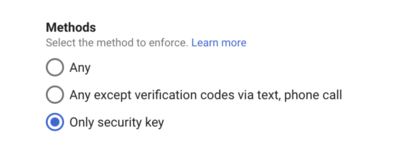
Depending on the service, this will be configured in different ways (or unfortunately may not be supported). Google Workspace allows you to cut over to security key only verification via the Security > Authentication > 2-Step Verification setting on the admin dashboard.

With these security keys strictly enforced, you can now rest assured that access is being provided via phishing and social engineering proof authentication!


